Second Battle of El Alamein

Lieutenant General Bernard Montgomery, commanding the British Eighth Army in North Africa, in the turret of his Grant command tank at El Alamein, 5 November 1942. Lieutenant General B L Montgomery, General Officer Commanding Eighth Army, watches the beginning of the German retreat from El Alamein from the turret of his Grant Tank. He is wearing his famous tank beret.

{{|1=Una grande battaglia su larga scala svolta fra il confine militare della Libia italiana e l'Egitto britannico nel 1942.}}

Second Battle of El Alamein, Deployment of Forces on October 23rd, 1942

Second Battle of El Alamein, The Allied Forces attack: 10pm- October 23rd, 1942
Second Battle of El Alamein, The Axis Armoured Divisions counterattack: 6pm- October 24th, 1942

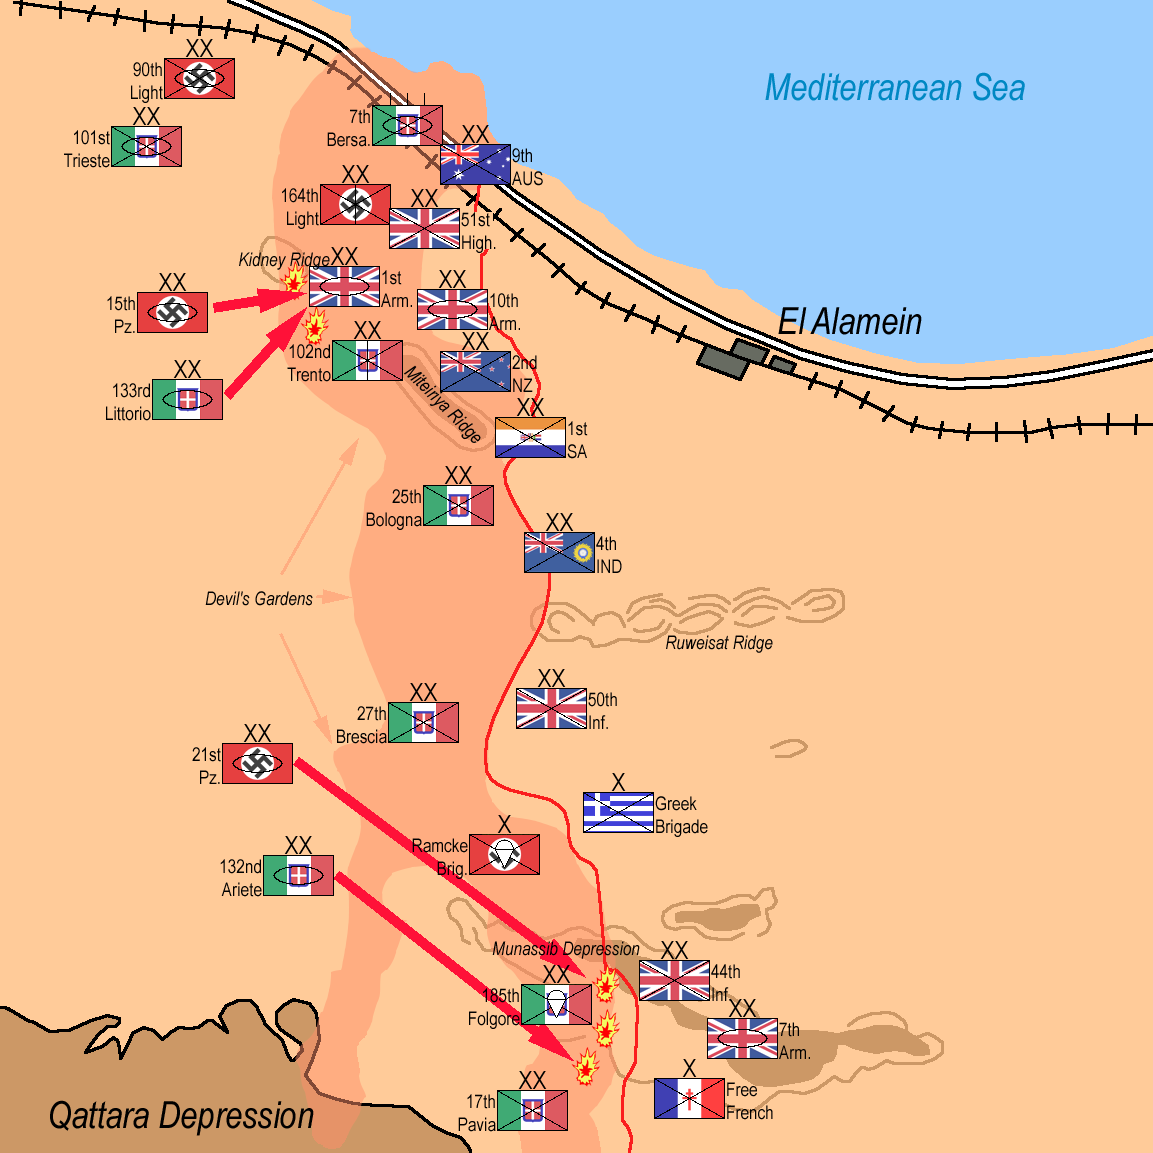
Second Battle of El Alamein: Allied 1st Armoured Division and 51st Highland Division attack German 164th Light Division: 12am- October 25th, 1942. Allied 7th Armoured Division attacks Italian Folgore Parachutist Division: 1pm- October 25th, 1942.
Second Battle of El Alamein: 1st Armoured Division is counteattacked by Littorio Armoured Division and 15th Panzer Division. 1st Armoured Division and 51st Highland Division break off their attack: 3:30pm- October 25th, 1942. 7th Armoured Division breaks off its attack on Folgore Parachutist Division. 9th Australian Division attacks 164th Light Division: 9:30pm- October 25th, 1942.

Second Battle of El Alamein: 7th Armoured Division, 44th Infantry Division, 50th Infantry Division along with the Greek 1st Infantry Brigade and the Free French Brigade attack Folgore Parachutist Division from three directions: 10:30pm- October 25th, 1942 until 3am- October 26th, 1942.

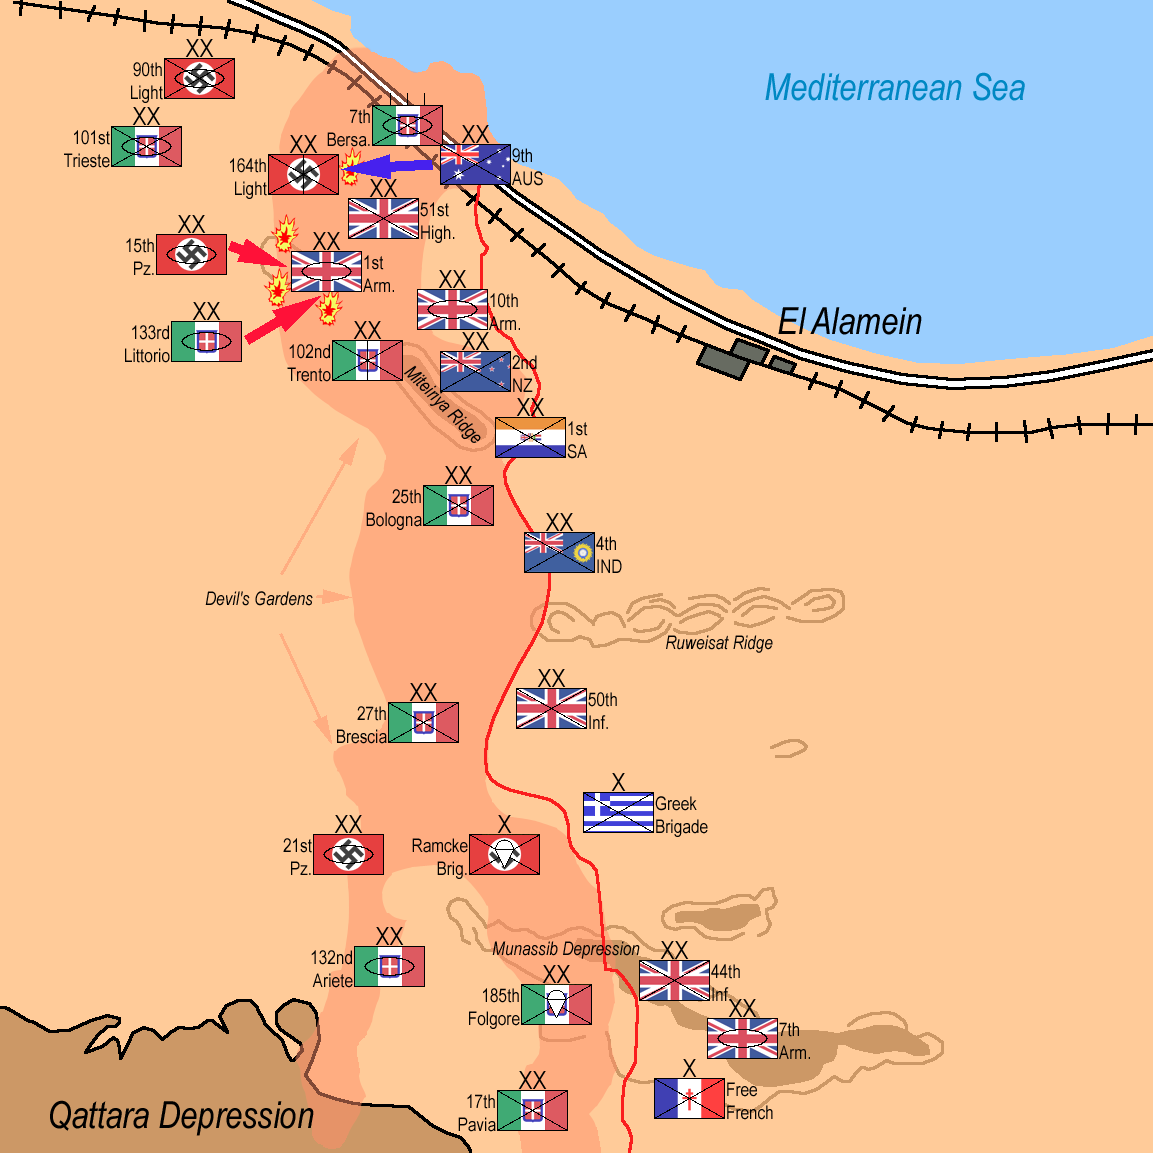
Second Battle of El Alamein: 7th Bersaglieri Regiment attacks 9th Australian Division: 8am- October 26th, 1942. 51st Highland Division takes Kidney Ridge, further advance stoped by counterattack north of Kidney Ridge by Littorio Armoured Division: 5pm- October 26th, 1942. 2nd New Zealand Division and 1st South African Division advance 1km against Trento Division: 5:30pm- October 26th, 1942.

Second Battle of El Alamein: Both sides reorganize the deployment of their Forces: Night of October 26th to October 27th, 1942.

Second Battle of El Alamein: 21st Panzer Division, 15th Panzer Division and Littorio Armoured Division attack 51st Highland Division, but fail to retake Kidney Ridge: 8am October 27th, 1942. 7th Bersaglieri Regiment tries unsuccessfully to dislodge Australian 9th Division from Hill 28: 10am October 27th, 1942. 44th Infantry Division probes Folgore Parachutist Divisions defences: October 27th, 1942. 7th Armoured Division moves north: October 27th, 1942.
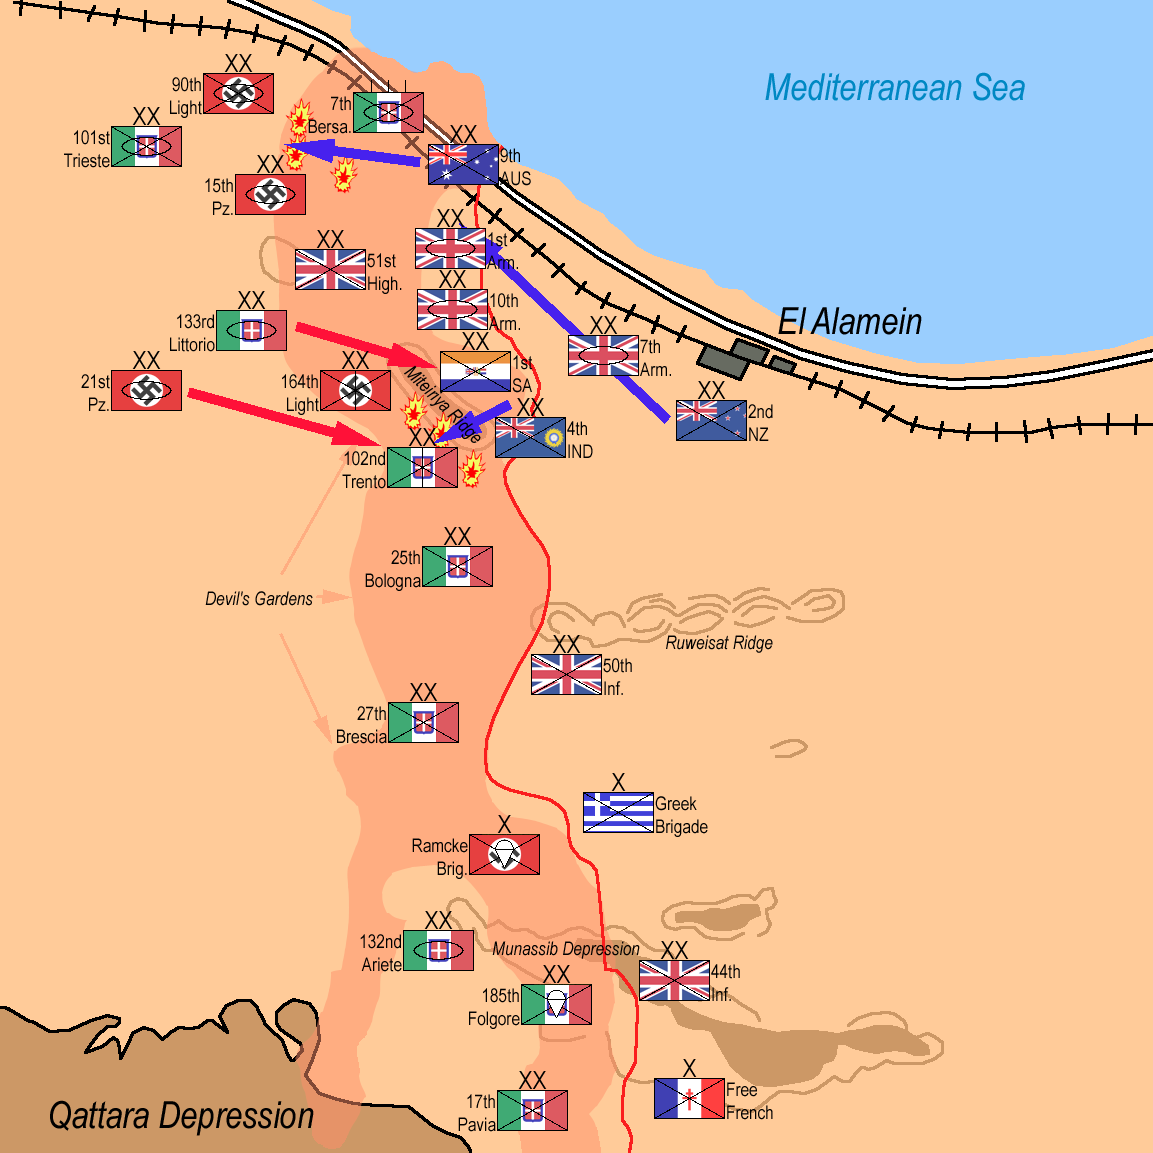
Second Battle of El Alamein: Trento Division under heavy attack by 1st South African Division and 4th Indian Division falls back. 21st Panzer Division and Littorio Armoured Division counterattack and stabilze Axis front: October 28th, 1942. 2nd New Zealand Division moves behind 9th Australian Division. October 28th, 1942. Australian 9th Division attempts to break through Axis lines west of Hill 28: 10am October 28th, 1942.

Second Battle of El Alamein: Australian 9th Division gives up attempt to break through Axis lines west of Hill 28: October 29th, 1942. Axis Commander General Rommel reorganizes his troops: October 29th, 1942.

Second Battle of El Alamein: Operation Supercharge begins. Australian 9th Division attacks to open breach in Axis line for 2nd New Zealand Division: 11pm October 31st, 1942. Australian 9th Division fails and returns to starting position. Supercharge pushed back 24h: November 1st, 1942.
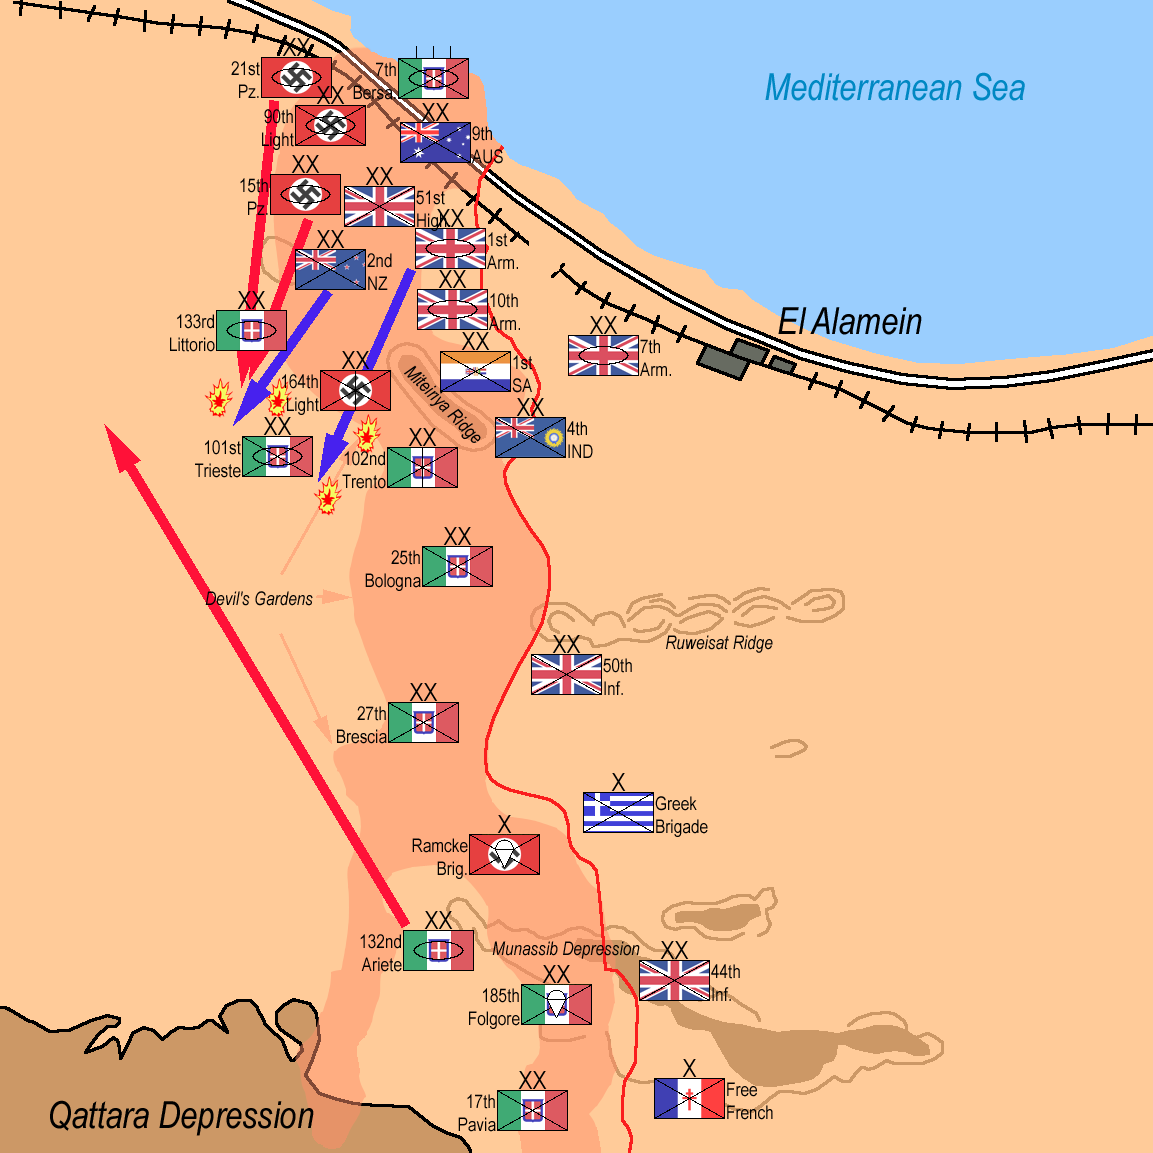
Second Battle of El Alamein: 2nd New Zealand Division and 1st Armoured Division attack south and push back Trieste Division: 1am November 2nd, 1942. 15th Panzer Division and 21st Panzer Division counterattack- Tank Battle of Tell el Aqqaqir: 9am November 2nd, 1942. Ariete Armoured Division moves north: November 2nd, 1942. Trento, Bologna, Pavia, Brescia, Folgore Divisions and Ramcke Brigade begin retreat: 10pm November 2nd, 1942.

Second Battle of El Alamein: Axis units begin their retreat: November 3rd, 1942.

Second Battle of El Alamein: Axis units halt their retreat on order from Adolf Hitler: November 3rd, 1942.

Second Battle of El Alamein: 9th Australian, 2nd New Zealand, 1st Armoured, 7th Armoured and 10th Armoured attack: 7am November 4th, 1942. 1st Armoured and 10th Armoured break through and drive towards the coast. 2nd New Zealand Division moves toward Fuka destroying the remnants of Bologna and Trento Divisions on its way. 7th Armoured Divisions encircles Ariete Division, which is destroyed. Axis forces flee.

הערכות כוחות הצדדים היריבים ערב פתיחת הקרב בקרב אל-עלמיין השלישי

IWM caption : Kittyhawk Mark III, FR241 LD-R, of No. 250 Squadron RAF, taxying at LG 91, Egypt, during Operation LIGHTFOOT, the first phase of the Alamein offensive. FR241 is an early short-tail Mark III with a dorsal fin, which also served later with No. 112 Squadron RAF.
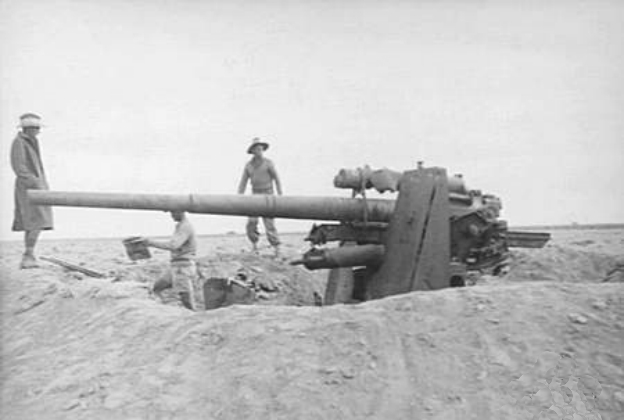
A German 88 mm FlaK 36 gun which had been used as a tank attack weapon near El Aqqaqir, Egypt. The whole crew were killed and were found buried alongside the gun. Allied Sherman and Crusader tanks can be seen on the skyline.

A British soldier gives the "insult" version of a V-for-Victory sign to German prisoners captured at El Alamein, 26 October 1942. A British soldier gives a V-for-Victory sign to German prisoners captured at El Alamein, 26 October 1942.

A mine explodes close to a British truck as it carries infantry through enemy minefields and wire to the new front lines.

An abandoned German Sd.Kfz. 135/1, a 15 cm self-propelled howitzer on french Lorraine chassis, in North Africa in September 1942.
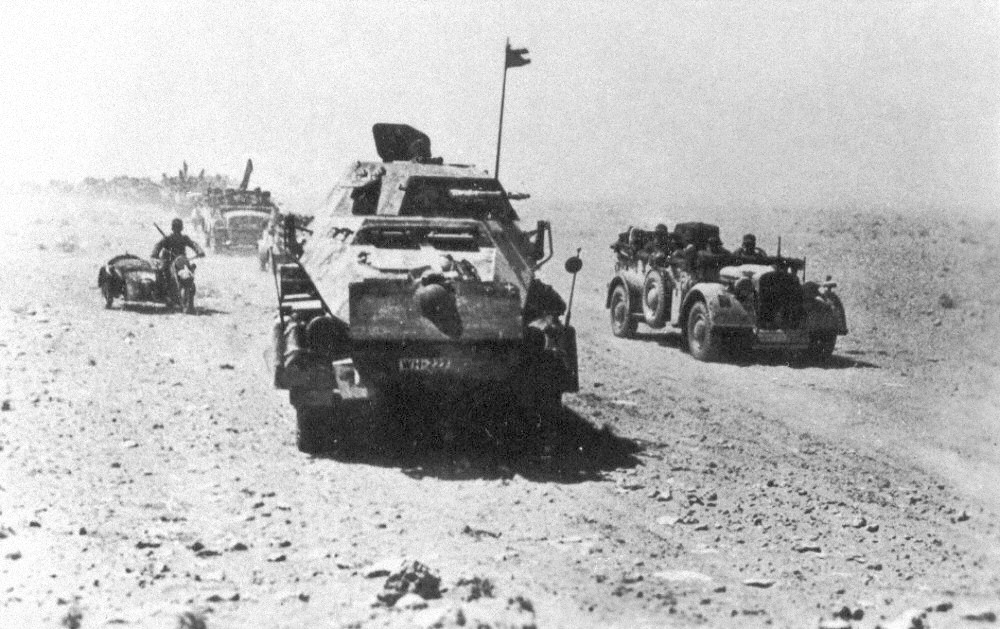
The Panzerjäger-Abteilung 39 (part of "Kampfgruppe Gräf", part of the 21. Panzer Division) of the Afrika Korps on the move. Original caption: "Vormarsch der Panzerjäger-Abteilung 39."

המערכה במדבר המערבי, יולי 1942.
Historical Overview
Decisive battle of attrition; start of German retreat.
Quick Facts
UK
- Commander: B. Montgomery
- Strength: 195000
- Casualties: ca. 13.500
Afrika Korps
- Commander: Erwin Rommel
- Strength: 116000
- Casualties: ca. 30.000
Strategic Context
Strategic turning point in North Africa.
Related Literature


Historical Locations
Interactive map requires third-party cookie consent.