Schlacht von Paardeberg

10th Hussars Nordenfeldt Gun detachment.
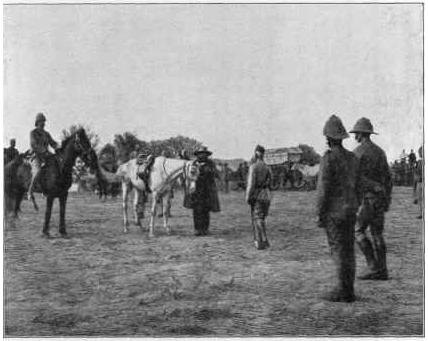
The Boer General Piet Cronjé surrenders to the British after the Battle of Paardeberg

An illustration of "the bird's eye view" of the Battle of Paardeberg from Bacon's South Africa War prints. In the distance, on the far bank of the Modder River, the Boer laager can be seen as it is assailed from both sides by British troops.

An illustration of "the bird's eye view" of the Battle of Paardeberg from Bacon's South Africa War prints. In the distance, on the far bank of the Modder River, the Boer laager can be seen as it is assailed from both sides by British troops.

L'artiglieria britannica bombarda il laager boero durante la battaglia di Paardeberg

16th Lancers at the Battle of Paardeberg on 27th February 1900.

Boer positions on the Modder River at the Battle of Paardeberg on 27th February 1900 in the Great Boer War: picture by H.C. Seppings Wright. Illustration for The Illustrated London News, 31 March 1900.

Boer trenches in the Modder River bank at the Battle of Paardeberg, 1900

Artwork by Henry Marriott Paget (31 December 1856-27 March 1936) from the Wellcome Collection at https://wellcomecollection.org/works?query=%22Paget%2C%20H.%20M.%201857-1936.%22

Boer War: a military physician bandages a wounded man in the open air, others watch. Halftone after H. M. Paget, c.1900. Iconographic Collections Keywords: Bernard Forde; H.M. Paget; Reinhold Thiele

Boers at the Battle of Paardeberg on 27th February 1900.

British troops watching the landscape at Paardeberg with the winding bed of the Modder River in the centre.

Canadian Infantry during the Battle of Paardeberg on 27th February 1900.

Illustration of the Royal Canadian Regiment charging Piet Cronje's laager on Bloody Sunday during the Battle of Paardeberg.

Boer maxim guns captured at the Battle of Paardeberg on 27th February 1900.

AWM caption : "CAPE TOWN, SOUTH AFRICA, C.1900. MAXIM ONE POUND AUTOMATIC GUN, CALLED A "POM POM" CAPTURED FROM GENERAL CRONJE AT PAARDEBERG IN 1900. NOTE THE BULLET HOLES IN THE COOLING JACKET." Text on image in white ink: "CRONJIE'S POM-POM. / RANGE 3.090 YARDS, FIRES 300 ONE POUND SHOTS A MINUTE.". NOTE : This version has brightness and contrast artificial increased to show detail, as the original is somewhat dark.

Christiaan de Wet - Sketch map of military positions at Paardeberg, South Africa, February 1900. Legends on map: A. Position from which De Wet drove the English. B. English Positions. C. English Camp. D. Cronjé's Laager. E. Stinkfontein.

General Cronjé's camp at Paardeberg, South Africa, after the artillery bombardment of 18-27 February 1900

Godfrey Douglas Giles:The Attack on Cronje's Force at Vedute Drift near Paardeberg, 1900. Oil on canvas. From the source: "'The Graphic' employed Giles, a veteran of the 1st Sudan War (1884-1885), as a special artist during the Boer War; he was present at the Relief of Kimberley and the later capture of Cronje." The Graphic was a British weekly illustrated newspaper. National Army Museum NAM Accession Number NAM. 1967-05-67-1 Copyright/Ownership: National Army Museum, Out of Copyright Location: National Army Museum, Study Collection Object URL: https://collection.nam.ac.uk/detail.php?acc=1967-05-67-1

Soldati britannici feriti, principalmente highlanders, durante la battaglia di Paardeberg

Innovative secure trenches in Cronje's laager in the Modder River bank at Paardeberg.

Kitchener and General Cronje's messenger, Paardenberg, February 19, 1900

Lieutenant Francis Newton Parsons, Essex Regiment, received the Victoria Cross at the Battle of Paardeberg during Second Boer War. One of the 'Victoria Cross Heroes' series of Taddy cards published in 1904.

Looted Boer stocks are hauled by oxen across the Modder River at Paardeberg. British soldiers were allowed to loot the remainder of Boer stores. It was brought across the river in ox waggons with oxen.

Paardeberg Monument Province House Halifax NovaScotia by Hamilton MacCarthy

British troops observe the Boer laager at Paardeberg.
Historische Übersicht
Erste große Niederlage der Buren; Kapitulation von General Cronjé.
Fakten auf einen Blick
Königreich Großbritannien
- Befehlshaber: Lord Kitchener / Roberts
- Truppenstärke: ca. 15.000
- Verluste: ca. 1.200
Buren-Republiken
- Befehlshaber: Piet Cronjé
- Truppenstärke: ca. 4.000
- Verluste: ca. 4.000
Strategischer Kontext
Britische Gegenoffensive zur Vernichtung der Buren-Hauptstreitmacht.
Weiterführende Literatur


Historische Orte
Die interaktive Karte erfordert die Zustimmung zu Drittanbieter-Cookies.